Showing posts with label tutorial. Show all posts

Thursday, October 22, 2015

Binding Technique

I know that Patty the Quilt Lady does this on her quilts.  And I think I have seen a tutorial on her blog about this binding technique.  I could be wrong, but I do think it was her.  She will have to set me straight.  Right now she has a bias binding she is doing on a scalloped quilt.  Worth checking out as well.

Jim Morrison and the Don't You Love Her Madly *I won an honorable mention, did I say that?* quilt has two parts, the light and the dark.  The glad and the mad. The love and the pain.  Well, the black and the white.  And an honorable mention ribbon.

I wanted to make sure the two parts were clearly defined in both the interior of the quilt and the binding on the quilt.  The binding is such an integral part in a quilt like this.  Not so much in some other quilts, but on this one it is very important. Another important thing on a quilt is a hook on which to hang your honorable mention ribbon.  When you get one.  Like I  did.

I tried several ideas and ended up knowing that I needed two distinct colors in the single binding.

Have you ever seen a binding that was one color on the front of the quilt and another on the back?  have you ever done one like that?  Maybe will try one of those soon, and probably up my win status to maybe 3rd.......or even 2nd.    Right now, here is how I did this two tone binding

Hopefully this sounds good, I took one of the sleeping pills and then decided to do this tutorial.  Sometimes i am zoning out and forgetting the point I was heading for. 


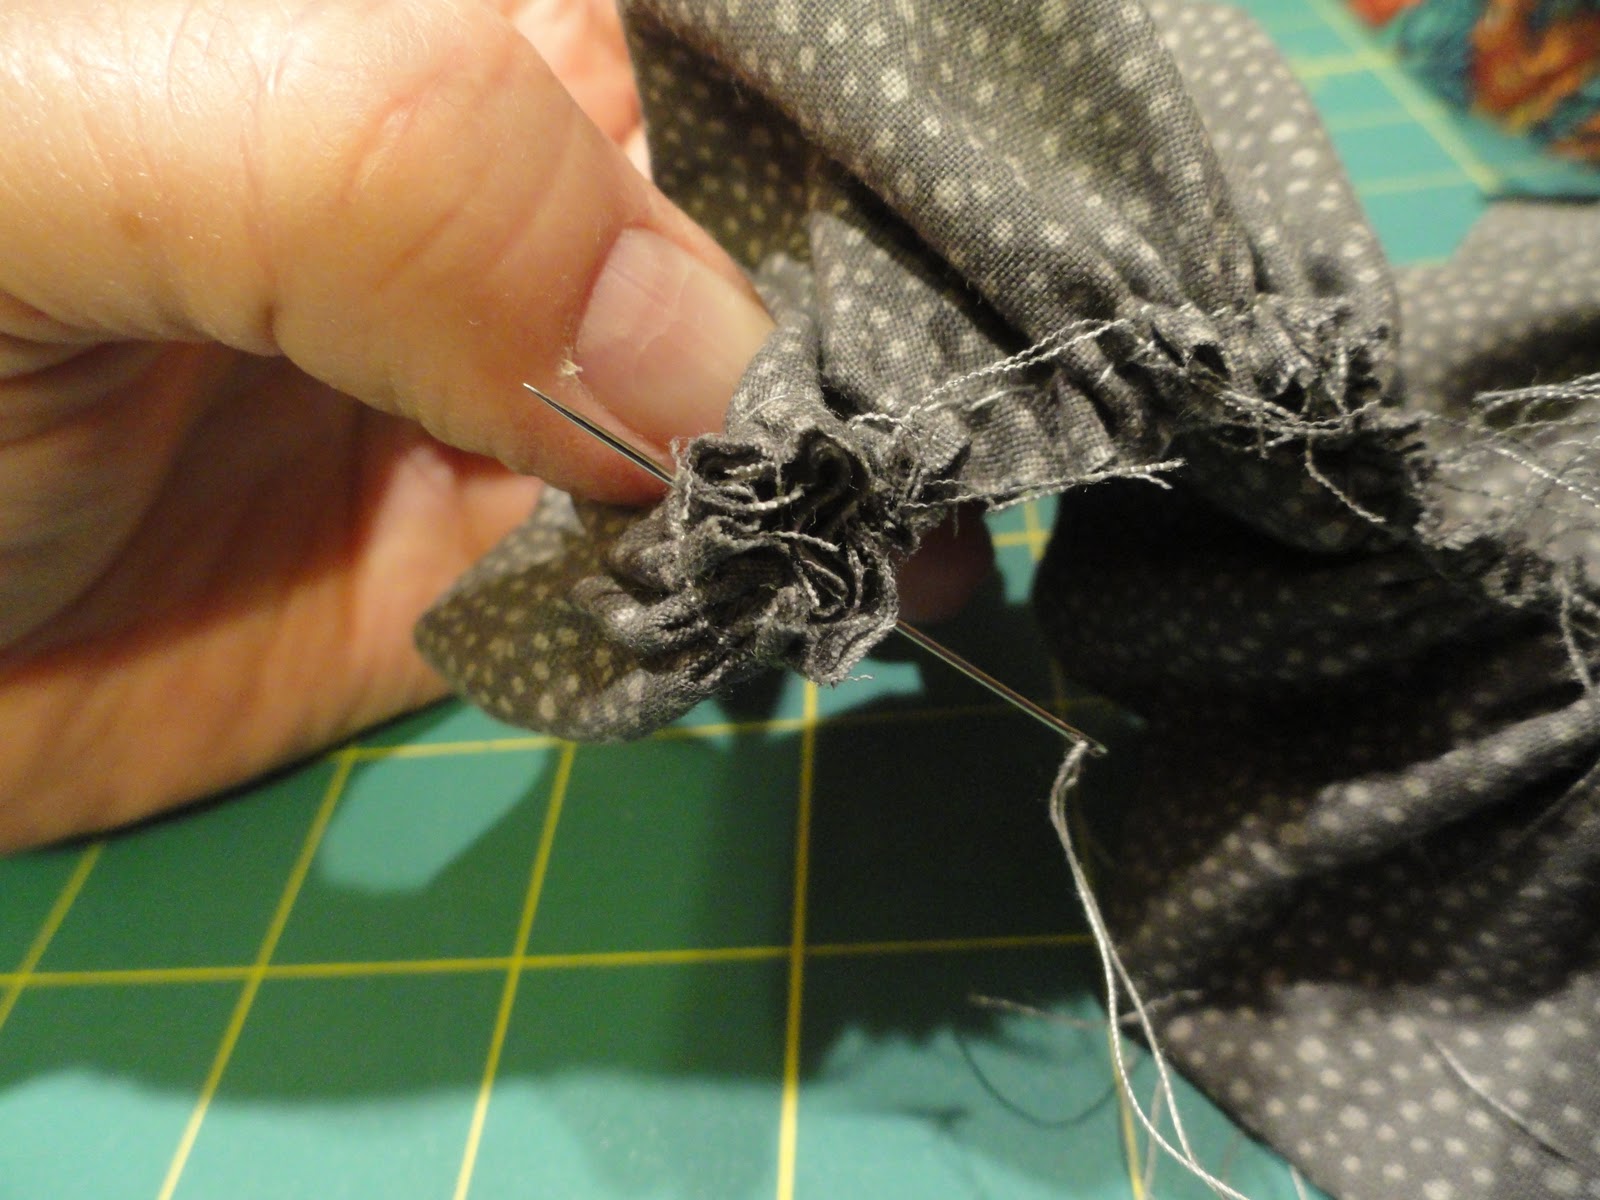
You start off at the area that needs to have a two color binding. Leave a tail on both colors and sew them away from the color change.  Sew your regular binding on the rest of the quilt area in the corresponding colors.


Leave the binding open like you would at the end, but at any place where the binding needs to meet in two colors.  A tail of 6 inches on each one is perfect. Perfect enough for an honorable mention.


Cut the white side off a quarter of an inch BEYOND the color  changes.  Do the same for the black side, cut it a quarter of an inch beyond the color change.  That gives you a half  an inch to make the seam.  A normal seam.

I use my fabulous washable markers to make a straight line for my scissors to cut.  If you don't have a straight line, sometimes the binding can get a wonky.  You want you  blocks to be wonky, not your binding. If you want your quilt to win an honorable mention, that is.


Sew it the way you usually sew it.  I press the seam open and then machine sew the loose part.


Perfection!!!!


Now to hand sew it down.......


Oh, and did I say I won an honorable mention?


Saturday, January 4, 2014

SetaColor Tutorial

I am hoping there will be Sun Prints anyway, there isn't much sun out there.  I have been waiting for a day with some sun and I am running out of days.  I need to get this project going so I have some time to quilt it.

What I am doing:

making a sun print for the Fiber Group Jan 14 Challenge: Herbal Resist

I couldn't come up with anything and Carol from Quilted Fabric Art (go check our her threadpainting of her dog Summer's sister, Spring!  Of course!).....what was I saying now?  Oh, Carol aka Landscape Lady, suggested a sun print.

Perfect!  I got out my SetaColors and chose a fat Quarter I had hand dyed last year or maybe the year before.  It is a light pink.  I was not really loving the lightness of the color.  I took the Oriental Red for the SetaColor paint.  SetaColor is an easy thing to use.

this is what Dharma says about SetaColor from their website:

"This is one of the most versatile fabric paints we carry. It also has the softest hand on fabric of any opaque or metallic paints we have tried. The thinner Transparent is even softer and can be used on the finest fabrics.

Transparent Setacolor is the paint of choice for Heliographic fabric art - yes, SUN ART. Lay your fabric down outside and sponge on diluted Transparent Setacolor in whatever color patterns you like. Then lay feathers, lace, netting, leaves, precut cardboard, flowers or anything on the fabric and let the sun do the rest. The objects you put on the fabric will leave their impressions. "

Then I found my cement backer board and cleaned it up.  It has been sitting outside since the Great McGee Eats The Scarf Episode.  I needed it for the paint base.  

I taped the fat quarter to the board with painters tape.  McGee had  

I diluted the paint about 2 to 1 with 2 water to 1 paint.  And painted it on with a sponge brush.  oh, first I wet the fabric with a light layer of plain water using the sponge brush.  I had a ton of paint  left over so don't use a whole lot of paint from the bottle.  I used the rest to dry brush on the other side of the FQ.  Photo later in post.


Here it is finished.  The paint part anyway. I like the color.  We shall see what happens in the end.  

 I needed herbs  So I went outside to find some.  I have bay leaves, parsley and weeds.   I  chose the weeds!  LOL.  Actually it is dandelion leaves.  

I tried to lay  them in a nice composition.  I  am not used to working like this, so I was considering balance and appearance when I placed the leaves.  

When I liked it, I pressed the leaves into the wetness of the fabric.  I am not sure if it will stay, I  probably could have pinned them down.  I am guessing that this will make a difference in shadowy edges and sharp edges.  I will most likely have shadowy edges.  Fine for now.  I ordered something fun for later though!
Here is what the whole FQ looked like.  Both sides.  And on the way out, I decided to tear some paper into small strips and lay it on the new side.  

When I finished it sort of  looked like a Chinese character.  I can do some work with that in the next project.  Can you enlarge the last photo and see the paper.  I don't  see any wind out there, so  i assume it will stay on there!

Here is the board laid out in what passes for sun today.  Althouh right now, the sun is shining well.  Hopefully it will print.  I am going to leave it out there for a full hour.
Oh, and it is not anywhere McGee can find it.  It is in the driveway, not the back yard!!!
I will post later about the results.
It was fun!  Want to try it?

UPDATE:  i just checked on it at about 20 minutes, and the paper has blown away but the dandelions are MARVELOUS!  It is looking real ombre like

Monday, September 24, 2012

Making a Pantograph for Quilting

My design wall was full this week, but I worked hard and finished two of the quilts on which I was working.  I am now ready to quilt them.  The Pumpkins will have to take second place for the quicker and easier Lockblocks.  But first, I needed a quilting design for it.

1998 comments at 4 pm on Sunday!  #2000 gets a prize!

I am cheap.  And I want things NOW!  So I figure out how to make them myself.  This is how I made the pantograph with which I will quilt the Lockblocks quilt.

First off, you have to have an idea of what you want to use as a quilting motif.  I wanted a simple design, that would fit in my space, and yet speak to the quilt pattern as a unique individual piece.  And I kept seeing loops!

I practiced loops with my fingers while we drove to lunch.  Keep it simple, I kept saying.  By the time we reached the Londoner with it's English Tea and scones I had a design ready.

Now to make it fit the quilt.  The color blocks are 4 inches square finished which means I had a 4 inch space to deal with and the center of which would be at the 2 inch mark.


I cut pieces of sheet paper 4 inches in width to get 2 strips from each page.  I did use my rotary cutter, the blade has a nick in it and I wasn't too worried about dulling it.

Hopefully you can see the pencil marks, they are pretty lightfor a reason.  So I can erase the not so great lines.


Here is your only math.  Take your time and think about it and you will be fine.  I marked off in pencil some registration marks.  The seams were 4 inches apart, block center is at two inches and I wanted at least 1/4 inch from both the top and the bottom.  The short loop would be half the size of the larger loop so I measured 2 inches across the center of the paper.

I needed something to create nicely rounded corners.  Fray Check!  On the center line of each block would be the tall loop.  The seam would be the short loop.  I used the same Fray Check bottle to create the short loop as well.

Then I connected the loops with lines using light pencil lines.  When the loops looked lopsided, and they all did, I redrew a new line before I erased the old.  I often had to redraw lines several times to get the section to look even.  Continue working with each loop until you really like it.

I used a permanent marker to darken the lines for tracing.  Then I carefully traced enough pages to cover the width of the quilt I was working on.

It is important to keep the pages straight so I used my 24 inch long 6 inch wide ruler as a straight edge and taped the entire length of the page edges together back and front to make the seams flat.  Make sure the loop on the end of one and the beginning of the next are approx 2 inches apart or your design will fail.  If you have problems with your design once you get ready to quilt, you can always cut your panto paper and reset it to the correct proportions, but it is easier to do it correctly at first.  (ask me how I know that!!)

When you put the pantograph on the shelf, mine is in front and above my quilt, it is easier to make sure the lines will be straight if you work carefully and precisely.

This one took me about 35 minutes to complete.

Fast, simple and cheap.  And it says LeLeLeLeLe........I should call this one Lelell.

Saturday, February 18, 2012

How about a process post? The Shadow Knows..........

How about a process post?  I love to read other people's processes when they are doing a new technique.  It is not only interesting (can be VERY interesting if there is cursing going on!) but it can also be very informative to "hear" why they are doing something and what they are thinking when they do it.  So here goes.  This is for the Shadow on the Wonky Plaid Shirt Log Cabin blocks.

1.  Square up your sashing material.  Remember we chose the cheddar?  Yes, nice choice everyone!  The quilt journal I decided to work in has disappeared.  You would not find it surprising if you saw the quilt room and knew how many times I had "cleaned" it up.  More like "cleared" it up.  I want a 2 inch sashing but a 1 inch shadow.  We will work on the shadow part right now then add the rest.  Go outside on a sunny day with a solid square and test your shadow smarts.  It is not what you think.  The shadow starts below the top and as you can tell, I had to rip it out and there was much cursing.
Wrong!

2.  Start with any block you desire as long as (for this instance anyway) it is 9 1/2 inches square.  Making sure it is square is the best way to get a nice square finished block.  Something I don't always get no matter how hard I try!

3.  Cut your pieces out for your background (Cheddar for me) and your tulle for the shadow.  I used black tulle here but dark green and dark blue would be good as well.  A lighter color would not give you the shadow effect but can be used for other effects.  (Like Fairy Dust, maybe?)

I gave lengths that are slightly over the exact figures.  Make one and adjust your sizes as you will.  Everyone sews differently.  I like to be slightly over and trim down.

Cut one of each:
Cheddar strip under tulle (C+T)
11 x 1 3/4
9 x 1 3/4

Cheddar strip with C+T
11 3/4 x 1 1/2
10 3.4 x 1 1/2

Cheddar Strip border
11 1/2 x 2 1/2
13 1/2 x 2 1/2

Cut two of these Small Rectangles
1 3/4 x 1 1/2

Tulle (Cut two)
22 x 2  (This will double over to 11 x 2)
C+T Strip

4.  Spray your C+T strip with Basting Spray to help keep the tulle workable.  Place your strips on a piece of scrap paper, don't spray on your cutting board or ironing surface.

Working with tulle is not difficult, neither is it very easy.  The sprayed strip will curl up slightly so you will have to take care to smooth it out without stretching either the strip or the tulle.  Lay one half portion of the tulle on the strip, smooth carefully and fold the other half back over itself.  Smooth without stretching.  You may have to remove the tulle and do it again if it is curling.
6. Melt - need I say more?

5.  Sew a Small Rectangle to the ends of each of the C+T strips.

7.  Sew C+T to left
6.  Press using a towel.  This is the best way I found to do the pressing.  Tulle will melt so work carefully.  I turned up the steam and used a fairly thick towel.  Keep your iron moving.  Don't over press.
7. Trim

7.  Sew the shorter C+T piece to the left side of your block with the Small Rectangle at the top left corner.  Press carefully using towel. Trim.

8. Sew and trim
8.  Sew the other C+T piece to the bottom of your block with the Small Rectangle at the lower right corner.  Press using towel.  Trim.

9.  Trim your border pieces to 2 1/4 inches on both sides.  Do not trim the other unbordered sides.  Use this opportunity to straighten your block if any seams have shifted.  Your entire block should now be 11 1/2 x 11 1.2 exactly.  Before you trim the sides make sure you can get an 11 1/2 x 11 1/2 block adequately!

10. Sew the shorter 2 1/2 cheddar strip to the top of the block.  You can press carefully without the towel but remember if you touch the tulle it will melt!


11.  Sew the last 2 1/2 inch strip to the right side of the block.  Again press carefully.

Your block should be 13 x 13 inches square and look somewhat like these guys.

I don't know why the shadow on the right block dips downward but it will look like the block is slightly curved.  But that is another tutorial!

Hope you enjoyed making shadows with me.  I will get the rest of the blocks done and show you the top.  Then I will quilt it.  Fun!

glen:  I was so proud of myself with these blocks.  I called excitedly to Frank and say, what do you see here?  He looked at them in total concentration, thoughtfully considering, and said:  well, there is a red piece, and a blue piece and a yellow piece.  And I think I see my black and yellow shirt..............And I panicked, suddenly remembering the pants episode.  Check it out below.

Liar Liar Pants on Fire!


Friday, November 25, 2011

OMG! I just invented something! - the flower tutorial

Probably not, but I thought this through on my own.  My Internet blipped and I didn't have the desire to walk in the back, unplug the router, wait 45 seconds, replug it in, wait for it to cycle up. 


I made a fabric basket.  It is so cool looking and I totally love it! I am feeling it, baby!  But it was plain and needed a flowery pick-me up. 

So I plunged in and did what I thought would look like a flower.  And it was so damn cool.  Like, really cool.  Here is how I did it.  (and a test to see if I can do it again or if this was just a fluke......)

Let me know what you think and if you have any questions.  If you like it, say so!

1.  Cut a strip of fabric 3 1/2 (or so) inches wide WOF.  Smaller widths make smaller flowers of course. 

2.  Iron the strip in half and sew a gathering stitch the length of the side where the raw edges meet.  I didn't pay too much attention to straight or even, and found it really needed heeding.  So make sure you cut a straight strip and iron it evenly.  Then sew it where you catch both sides of the raw edges.  I will show you what happens when you don't a bit further down. 

3.  My mother taught me to run a double gathering stitch line.  I always thought it was because she wanted to torture me and make me do double busy work.  But when my thread broke in the middle, I finally understood.  I worked it out and won't do a double stitch, just wanted to share that with those overachievers my mother would have loved to have had for a daughter instead of me.

4.  When you start the gathering stitch turn down the selvage edge of the strip like this.  Make a little triangle.  This will be the center of your flower.

5.  Look at all those strings!  Yuck.  They kept getting in my way.  I wish I had a serger 'bout now.

6.  It looks good from the side.  You want your gathers to be pretty tight.  When I made the 2 1/2 inch strip I cut the WOF in half and made it smaller.  That one came out just as full and you still want the gathers pretty tight together.  You can see it wants to curl naturally.  Try and keep it from tangling up and twisting.  Yeah, just try it!

7.  Begin to roll the flower.  Take the triangle part and begin to roll it tightly.  Oh, you will need a needle and thread.  If you have a long needle use that.  The first needle I grabbed was the shortest needle I ever saw.  I didn't know I owned such a needle until that moment.  Hmmm.  You will need more thread than that too.


8.   Begin to roll from the triangle part and every once in a while take a stitch with your needle.  I always tied off when I tacked a part down.  For no reason, just did. 

9.  Keep rolling.  Keep tacking.  Pay attention to how you are rolling the bottom edge with all the strings.  Keep it flat so you end up rolling it rather than have it slide up toward the center.  My little one did that and I had problems.  That one became a bud.


10.  A problem.  Here is the problem part where I didn't catch both sides of the raw edges in the gathering stitch.  Don't know if you can see it here on the left but the edge is sticking out and I had to do flower surgery to fix it.


11.  Here is the finished flower.  So excitingly wonderful and fabulous!  Yes!


12.  And here it is on the fabric basket that no longer looks plain and ordinary.Can you see the blue dots in the very left edge?  That is the inside of the basket.   The outside was obtained from the Purple Cow for $1.99.  It was a curtain so it is just heavier than quilt fabric but not so heavy that it is difficult to work with.  And it gives some body to the basket.  It is a peachy pink and looks wonderful.

I have more plans for those baskets!

Hope you have enjoyed this tutorial.
glen