 First you need a journal or notebook. I have a number of them laying around, for
what reason? I have no idea, but they
are here. So I will give them away this
Christmas! With new covers! Yes.
I did not invent this method, but I saw it on the internet 3 or 4 places. I have made covers from all the sites, and I saved one, but of course I can't find it right now. It is saved in my computer somewhere in cyberspace.
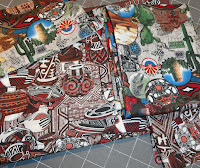
First you need a journal and some fabric. You need to find something you love for the outside focus fabric and a compliment for the inside. The inside
is not so important because you really don’t see it but I do like to make them
match somewhat. Here are my choices. I am going to attempt to center the round
design on the front cover, I said I would at least attempt to do that.
You also need some batting that is just larger than the size of your piece. Your fabric pieces should be just larger than your book when it lies open.
 Now, layer ONLY the front and the batting, I do spray but you can
baste with pins or stitching if you like.
And quilt to your heart’s desire! I ran out of bobbin half way through the quilting and just dropped another color in there. No matter, it won't show!
 Place the inside fabric on top and face down. Lay your book (closed) on the three layers where you want the front to be. We will cut them all to size. Look mom----no math!
 Use a marking pen of your choice to mark around the
book. I mark just a scootch outside the actual size of the
book, barely outside.
Turn the book up to account for the spine.
Lay it down on the other side to get the back of the book drawn.
Take your inside piece and cut it in half. Turn under the long edge and then turn it
under again, sew the edge facing with a small seam. Do that to both sides of the inside fabric.
Place the front/batting quilted piece face up. Place the two inside pieces face down with the raw edges to the outsides of the quilted piece. lay s strip
of fabric wide enough to cover the gap face down between the two backing pieces.
Odd, I know, but trust me here.
Sew around the entire edge with a quarter inch seam. Do not leave an opening, sew the entire thing. Trim the edges and turn the cover to the
right side.
Aha! See, it worked!
Bend the cover and back of the journal backwards and place
the fabric sleeve over the book covers.
 They whip up very quickly and will be fabulous for small gifts or gift exchanges in your guild. I even made some for the tiny moleskin journal books and sketchbooks I use as my repository for ideas.
Here are the three I made this afternoon while saving McGee's life. That dog is so bad. Two moleskin babies and the larger one. And I didn't do too bad of a job on that centering thing.
Show me what you made when you make them!
Enjoy!


Thanks for posting this! The journal covers look really neat, and I do have a few notebooks that could benefit from colorful covers. (First, though, the Christmas present quilts I _just_ got back from the quilters need to be bound and labeled and mailed.)
ReplyDelete